
Propagation
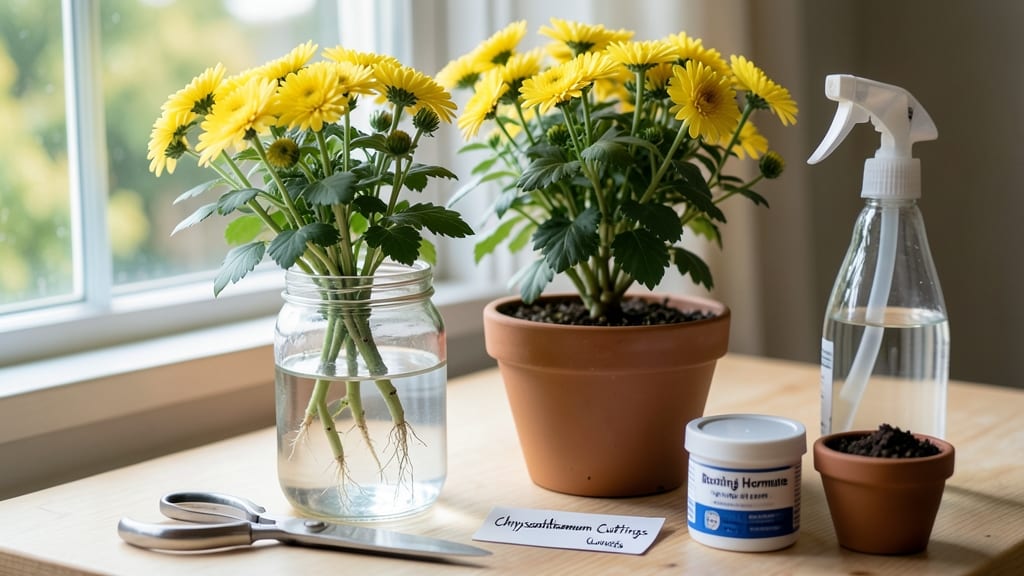
How to grow mums from cuttings lets you turn favorite plants into a fall garden full of free, vibrant blooms—no nursery tags, no guesswork. My garden now overflows with showstopping color every year, even from single plants I’ve propagated this way.
The secret starts with timing: take cuttings in early summer when new growth is firm but still flexible. You’ll need sharp scissors, rooting hormone (optional but helpful), and either water or moist potting mix.
Most people mess up the humidity—covering cuttings with plastic creates that tropical greenhouse effect they crave. Within 3-4 weeks, you’ll see roots forming, ready for their own pots.
By late summer, these baby mums will be sturdy enough to plant out, giving you a head start on next year’s blooms. The payoff? Double the flowers with half the cost, plus the satisfaction of growing something truly showstopping.
No more reaching for store-bought mums that wilt by Thanksgiving—your garden will deliver bold, long-lasting color that lasts.
Works for any chrysanthemum variety, from classic yellows to deep burgundies. The key is patience—these cuttings need consistent moisture and bright, indirect light. Once established, they’ll reward you with years of reliable blooms, proving that a little summer effort means fall color without the price tag.
📚 In This Guide
- What you need
- Instructions
- Tips and common mistakes
- Wrapping up and next steps
What you need
- ● Mum cuttings: Healthy, non-flowering stems (4–6 inches long) with at least 2–3 sets of leaves. Tip: Choose stems from the current season’s growth for best results!
- ● Rooting hormone: A powder or gel (e.g., Rootone or Clonex) to boost root development.
- ● Well-draining potting mix: A blend of perlite and peat moss (or coconut coir) in a 1:1 ratio. Avoid garden soil—it can harbor diseases!
- ● Small pots or trays: 3–4 inch diameter pots or a seedling tray with drainage holes. Quantity: 1 pot per cutting.
- ● Plastic or glass cloche: To create a humid environment (e.g., a clear plastic dome or a cut-off plastic bottle).
- ● Spray bottle: For misting cuttings gently (avoid soaking the mix!).
- ● Scissors or pruning shears: Sharp and clean to make 45-degree cuts just below a leaf node.
- ● Watering can with a fine rose: For light, even moisture.
- ● Bottom heat mat: Keeps roots warm (70–75°F) for faster rooting. Pro tip: A heating pad set to "low" works great!
- ● Fungicide: Like Mycorrhizal inoculant or hydrogen peroxide (3%) to prevent rot.
- ● Grow lights: If propagating indoors with low light, use LED grow lights (12–14 hours/day).
- ● Labeled tags: To track varieties (e.g., "Pink Quill" or "Mum Type").
- ● Old newspaper or mulch: To cover the tray and retain moisture.
Step-by-step instructions for propagating mums from cuttings
Here's the foolproof method I use to multiply my chrysanthemum collection—no special equipment needed.
Select Healthy Mums for Cuttings
Choose mature chrysanthemum plants with strong, woody stems and no signs of disease. The best cuttings come from the current season's growth, specifically the 4-6 inch sections just below a leaf node. Avoid flowering stems—they won't root as easily. I always pick my healthiest plants first, since they'll produce the most vigorous cuttings.
Use clean, sharp pruners to make a 45-degree angle cut about ¼ inch below a leaf node. This angled cut increases surface area for root development. Remove the lower leaves, leaving only the top 2-3 sets of leaves. Too many leaves stress the cutting by increasing water loss before roots form.
Prepare the Cuttings for Rooting
Place the prepared cuttings in a container of room-temperature water, ensuring the cut end is fully submerged. I like to use a clear glass so I can monitor root development. Change the water every 2-3 days to prevent bacterial growth. Roots typically appear in 2-3 weeks, but some varieties take longer—don't rush it.
Once roots reach 1-2 inches in length, the cuttings are ready for planting. You'll notice small white or yellow root hairs forming first, followed by thicker roots. This is your signal that the cutting has established enough of a root system to survive in soil.
Plant the Rooted Cuttings
Fill small pots—4-6 inches in diameter—with a well-draining soil mix (equal parts perlite and potting soil works well). Make a hole in the center of each pot with your finger, then gently place the rooted cutting into the hole. The soil line on the cutting should sit ½ inch below the soil surface.
Firm the soil gently around the cutting to eliminate air pockets. Water lightly until moisture seeps from the drainage holes. Place the pots in a location with bright, indirect light—direct sun can scorch young leaves. Keep the soil consistently moist but not soggy; mums hate wet feet.
Maintain Humidity and Light for Establishment
Cover the pots with clear plastic bags or domes to create a humid environment. This helps reduce stress on the cuttings as they adjust to their new soil environment. Remove the cover for 10-15 minutes daily to allow airflow and prevent mold growth. You'll know the cuttings are adapting when new leaves begin to form.
After 4-6 weeks, when the cuttings show new growth and roots have firmly established, you can transplant them to larger containers or directly into the garden. Harden them off by gradually reducing the humidity cover time over 7-10 days before full exposure.
Encourage Blooming in New Plants
To promote flowering, pinch back the tips of new growth when the plants reach 6-8 inches tall. This encourages bushier growth and more blooms. Mums need 12-14 hours of daylight to flower, so supplement with a grow light if natural light is insufficient. Fertilize lightly with a balanced, water-soluble fertilizer every 4-6 weeks during the growing season.
With proper care, your new mums will bloom in their first year. The key is patience—rooting takes time, but the reward of year-round blooms makes it worth the wait. I've successfully propagated over 20 varieties using this method, and you can too.
Tips & tricks for perfect mum propagation
These insider tricks will help you avoid common pitfalls and maximize your success rate when propagating mums from cuttings.
Timing is Everything: The best time to take cuttings is in early spring or early fall when your mums are actively growing but not yet flowering. This gives the cuttings the strongest chance to establish roots before dormancy. I've found that late summer cuttings often struggle because the plants are focusing energy on blooming rather than root development. If you must take summer cuttings, choose non-flowering stems and be prepared for a longer rooting period.
Rooting Environment Secrets: While room-temperature water works, you can dramatically improve rooting success by adding a rooting hormone powder to the cut end before placing it in water. This isn't absolutely necessary, but it can cut your rooting time by nearly 30%. For the water method, I've had great success using a small glass jar with the stem submerged about 2 inches deep—this prevents the cutting from floating and keeps the cut end consistently moist.
Soil Mix Matters: The equal parts perlite and potting soil mix mentioned in the instructions works well, but you can enhance it further by adding a handful of coarse sand to improve drainage. This prevents the soil from becoming compacted and allows oxygen to reach the developing roots. I've also had good results using a commercial seed-starting mix which contains perlite and vermiculite by design—just make sure it's sterile to avoid introducing pathogens.
Lighting Strategy: While bright indirect light is ideal, many people struggle with finding the perfect spot in their homes. If your cuttings start looking leggy or pale, they're not getting enough light. A simple grow light on a timer for 12-14 hours daily can work wonders, especially in winter months. Position the light about 6 inches above the plants and adjust as they grow. I keep my grow lights on a timer set to 14 hours of light to mimic summer conditions and encourage robust growth.
Pro Tips for Grow Mums From Cuttings
- These insider tricks will help you avoid common pitfalls and maximize your success rate when propagating mums from cu...
- Timing is Everything: The best time to take cuttings is in early spring or early fall when your mums are actively gro...
- Rooting Environment Secrets: While room-temperature water works, you can dramatically improve rooting success by addi...
Frequently asked questions
Got questions about propagating mums from cuttings? You’re not alone! Here are answers to the most common queries to help you succeed like a pro.
When is the best time to take mums cuttings?
The ideal window is late spring to early summer (May–June), when mums are actively growing but haven’t yet flowered. This gives roots time to establish before winter. Avoid cutting during extreme heat or frost—your little cuttings need gentle conditions to thrive!
How long does it take for mums cuttings to root?
With patience (and the right setup!), you’ll see roots in 4–8 weeks. Keep humidity high and soil moist—think of it like a slow-cooker for roots! Transplant once you spot 1–2 inches of new growth or gently tug the cutting (resistance = roots!).
Can I grow mums from cuttings indoors?
Use a bright, south-facing window or grow lights to mimic sunlight. A humidity dome (or a plastic bag with holes) speeds up rooting. Just avoid drafts—mums hate sudden temperature swings. Indoor cuttings may take longer to root than outdoor ones, so be extra diligent with moisture.
Why are my mums cuttings turning yellow or mushy?
Yellowing or mushy stems usually mean overwatering or rot. Let the soil dry slightly between waterings (stick your finger in—top inch should be damp, not soggy). If rot sets in, trim the affected area and replant in fresh, sterile soil. Prevention tip: Use a well-draining mix (like perlite + peat) to avoid soggy roots!
Will mums grown from cuttings bloom the first year?
Probably not! Focus on root and foliage growth in Year 1. Many gardeners pinch back flowers in the first season to encourage bushier plants. With proper care, you’ll see vibrant blooms by Year 2—worth the wait for free, homegrown mums!
Still stumped? Drop your question in the comments—we’re happy to help troubleshoot!
Wrapping up and next steps
Growing mums from cuttings is a rewarding way to expand your garden with vibrant blooms while saving money!
With the right tools, patience, and a little care, you can propagate these cheerful flowers year-round. Start small, stay consistent, and soon you’ll be sharing your new plants with friends—or even selling them!
Ready to dive deeper? Try experimenting with different varieties or even indoor propagation to keep the fun going. Happy gardening! 🌸💚