
Tools
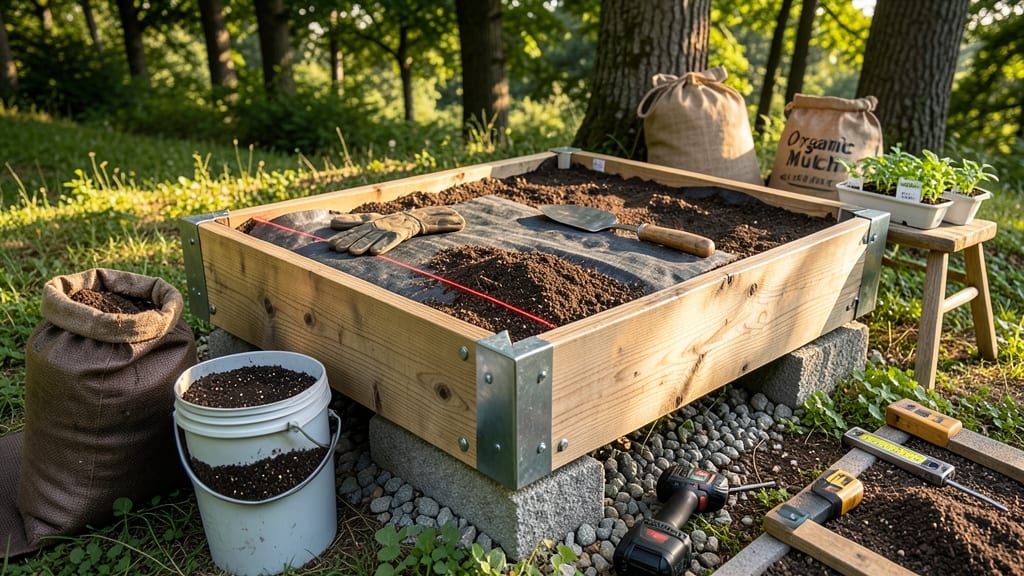
Elevated garden beds transform your yard into a highly productive growing space—no backbreaking bending required. 🌱 I built mine last spring after years of struggling with compacted soil and weeds choking my plants. The difference? Soil stays loose, roots grow deeper, and pests have nowhere to hide.
You’ll need untreated lumber (cedar lasts longest), screws or corner brackets, and a drill. Dimensions matter: 4' x 8' x 12" deep works for most veggies, but adjust height for accessibility. Drainage holes at the bottom prevent soggy roots, while landscape fabric keeps weeds out of your soil layers.
Layering is where the magic happens: cardboard (to smother weeds), wood chips (for drainage), compost, and your topsoil mix. This creates a fertile, fluffy growing medium that retains moisture better than in-ground soil. My beds stay productive for 5+ years with proper care.
Perfect for small spaces, bad soil, or anyone tired of weeding. Bonus: Kids and seniors can garden without strain. Let’s build one that’ll make your neighbors green with envy!
📚 In This Guide
- What you need
- Instructions
- Tips and common mistakes
- Wrapping up and next steps
What you need
- ● Untreated lumber (cedar, redwood, or black locust recommended for durability): 4 pieces of 2x6 boards (8 ft long) for the frame
- ● 4 pieces of 2x6 boards (4 ft long) for cross supports
- ● Galvanized or stainless steel screws (2.5–3 inches long) – at least 20 screws
- ● Landscape fabric (12–18 inches wider than your bed) to block weeds
- ● Soil mix (3–4 cubic feet per square foot of bed): 50% topsoil
- ● 30% compost
- ● 20% perlite or coarse sand (for drainage)
- ● Garden twine or bungee cords (to secure fabric)
- ● Drill/driver with screw attachment
- ● Measuring tape
- ● Level (to ensure your bed is even)
- ● Circular saw or handsaw (for cutting lumber)
- ● Work gloves (because splinters are the enemy!)
- ● Wheelbarrow or shovel (for hauling soil)
- ● Corner braces (for extra stability)
- ● Drip irrigation kit (for easy watering)
- ● Wood stain/sealant (to protect lumber)
- ● Knee pads (for comfy assembly)
Step-by-step instructions for building elevated garden beds
Here's my go-to method for constructing sturdy, long-lasting beds that improve drainage and extend your growing season.
🪴 Step 1: Choose and Prepare Your Location
Select a flat, level spot with at least 6-8 hours of sunlight daily. Avoid low-lying areas where water pools after rain—elevated beds should stay dry to prevent root rot. I recommend placing them near a water source for easy irrigation, but ensure the ground slopes slightly away from any nearby structures to prevent erosion.
Clear the area of weeds, rocks, and debris down to bare soil. Use a shovel to loosen the top 6 inches of native soil—this helps roots penetrate deeper later. Mark your bed dimensions with wooden stakes and string, keeping in mind each bed should be no wider than 4 feet for easy reach from both sides. Real talk: Skipping this prep step leads to uneven beds that wobble or settle unevenly over time.
🪴 Step 2: Assemble the Frame with Rot-Resistant Materials
For a 4-foot by 8-foot bed, you'll need 4 corner posts (4x4 lumber, 2 feet tall) and 8 long sides (2x6 lumber, 7 feet long). Cut the corner posts to your desired height—12-18 inches is ideal for most plants. Assemble the frame by screwing the long sides into the corner posts using 3-inch deck screws at each corner and every 18 inches along the sides.
Double-check that all corners are square by measuring diagonally—both measurements should be equal. If your frame feels unstable, add 2-3 horizontal supports between corner posts for extra rigidity. I like to pre-drill holes to prevent wood splitting, and always use galvanized screws to resist rust. Pro tip: Leave a 1-inch gap between the bottom frame and the ground to allow airflow and deter pests.
🌱 Step 3: Layer the Soil for Optimal Drainage and Fertility
Start with a 2-inch layer of coarse material—I use a mix of ½ inch gravel and 1½ inches of carbon-rich material like composted leaves or straw. This layer prevents compaction and improves drainage. Next, add a 4-inch layer of untreated hardwood chips or bark mulch to break down slowly and enrich the soil over time.
Top with a 6-inch layer of high-quality garden soil, mixed with 2 inches of compost. Avoid filling the bed completely—leave 2 inches of headroom for topsoil additions later. Water each layer thoroughly as you go to settle the materials. Here's the thing: Cheap soil or skipping the carbon layer leads to poor structure and nutrient runoff. Invest in quality materials upfront for long-term success.
✂️ Step 4: Secure the Bed and Add Finishing Touches
Place the assembled frame over the layered materials and gently press down to compress the soil slightly. Use landscape fabric to cover the bottom layer if your area has heavy clay soil—this prevents weeds from growing up through the bed. Secure the fabric with staples or rocks before adding the final 2-inch layer of topsoil.
Add edging around the outside of the frame to give the bed a polished look and prevent soil from spilling over. I like to use landscape timbers or bricks for a clean finish. Water the entire bed thoroughly after assembly to help the layers settle. Don't skip this step—proper settling prevents future shifting and ensures your plants have stable root support from day one.
💧 Step 5: Plant and Maintain for Long-Term Success
Wait 1-2 weeks after assembly before planting to allow the soil layers to fully integrate. Start with perennial plants or deep-rooted vegetables like asparagus or tomatoes, then fill in with annuals. I like to plant in a grid pattern for easy access and to maximize space—place taller plants on the north side to avoid shading shorter varieties.
Mulch the surface with 2-3 inches of organic mulch (like straw or shredded leaves) to retain moisture and suppress weeds. Water deeply 2-3 times per week, adjusting for your climate. The key to elevated beds is consistency—once established, they require less frequent watering than in-ground gardens. Watch for signs of stress like yellowing leaves or wilting, which usually means the soil is too dry or compacted. Here's where it gets fun: Elevated beds warm up faster in spring, so you can plant 2-3 weeks earlier than traditional gardens.
Tips & tricks for building elevated garden beds
These practical insights will help you avoid common pitfalls and create beds that last for years.
Site Selection Wisdom: The 6-8 hours of sunlight requirement is non-negotiable for most vegetables, but don't overlook microclimates. If your yard has areas protected from wind, those spots can actually get more sunlight than open areas. I've seen beds in protected locations thrive with just 5 hours of direct sun when they receive additional light reflection from nearby structures. Also, test your soil's natural drainage by digging a hole—if water pools after 6 hours, your spot needs elevation or amendment.
Frame Assembly Pro Tip: When cutting your 2-foot tall corner posts to 12-18 inches, remember this height is measured from the ground up. If you're using the bed for heavy plants like pumpkins or winter squash, aim for the 18-inch range to provide extra stability. For lightweight annuals, 12-14 inches works perfectly. I always cut posts slightly taller than needed—you can adjust the final height by adding gravel underneath during assembly rather than cutting too short.
Soil Layering Strategy: The 2-inch coarse material layer is your foundation's secret weapon. For maximum drainage, use a 3:1 ratio of coarse sand to small gravel (like pea gravel) in that layer. This prevents compaction while still allowing water to percolate. When adding the 4-inch hardwood chip layer, avoid using treated wood chips—the chemicals can leach into your soil over time. Untreated hardwood chips break down slowly and improve soil structure without introducing contaminants.
Long-Term Maintenance Secret: After your 1-2 week settling period, add a 1-inch layer of biochar to the topsoil before planting. This porous material improves water retention and nutrient availability while preventing soil compaction. I like to mix it in during the final 2-inch topsoil layer. The biochar also helps regulate soil temperature, which is especially beneficial in hot climates where elevated beds can become too warm for delicate plants.
Pro Tips for Make Elevated Garden Beds
- These practical insights will help you avoid common pitfalls and create beds that last for years.
- Site Selection Wisdom: The 6-8 hours of sunlight requirement is non-negotiable for most vegetables, but don't overloo...
- Frame Assembly Pro Tip: When cutting your 2-foot tall corner posts to 12-18 inches, remember this height is measured ...
Frequently asked questions
Got questions about building elevated garden beds? You’re not alone! Here are answers to the most common queries to help you get started with confidence.
What’s the best time of year to build elevated garden beds?
You can build elevated garden beds anytime—rain, shine, or even winter! However, spring or early fall is ideal for planting right away. If building in winter, store materials indoors to avoid rot or warping. Pro tip: Start with a level base to prevent drainage issues later.
How deep should elevated garden beds be?
Aim for 10–12 inches deep to accommodate root systems of most vegetables and herbs. For larger plants like tomatoes or bushes, extend to 18–24 inches. Deeper beds also improve drainage and reduce weeds. Use cedar or redwood if depth exceeds 12 inches—they resist rot better.
Can I use pallets or scrap wood for elevated beds?
Yes, but sterilize first! Pressure-treated wood is safest, but untreated pallets may harbor chemicals or pests. If using pallets, soak in vinegar or bleach solution (1:10 ratio) for 24 hours, then rinse thoroughly. Avoid creosote-treated wood—it’s toxic to plants.
What if my soil layers keep collapsing or sinking?
Collapsing layers usually mean poor compaction or insufficient depth. Fix it by:
- Adding coarse materials (gravel or broken bricks) at the bottom for stability.
- Mixing compost and topsoil in 50/50 ratios to improve structure.
- Using heavier borders (like cinder blocks) if wood frames warp over time.
Are elevated beds better for vegetables than flowers?
Both thrive, but elevated beds shine for veggies! They warm up faster in spring, drain better (preventing root rot), and deter pests like slugs. Flowers also benefit, especially heavy feeders like tomatoes or peppers. For flowers, prioritize well-draining soil mixes—add perlite or sand if needed.
Wrapping up and next steps
Building elevated garden beds is a rewarding way to extend your growing season, improve soil quality, and enjoy a thriving garden with minimal effort! 🌱 Whether you’re a beginner or a seasoned gardener, these layered soil secrets make it easier than ever to create a productive space.
Now that you’ve got the know-how, it’s time to roll up your sleeves and start designing your perfect bed—your plants (and future harvests) will thank you!
Ready to take the next step? Sketch your design, gather your materials, and start building! Happy gardening! 🌿