
How To
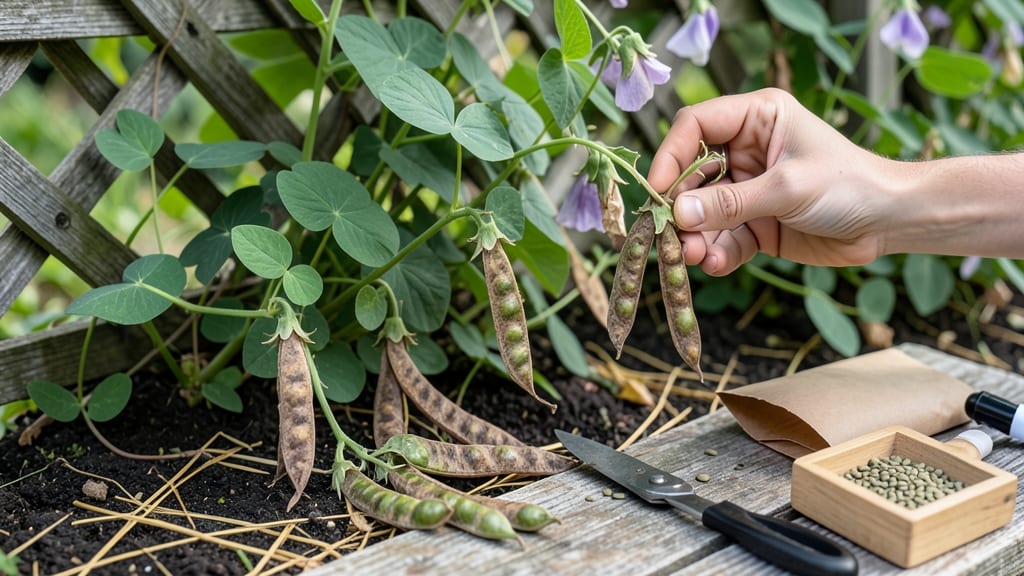
Harvesting sweet pea seeds 🌸 isn’t just about saving money—it’s about unlocking next year’s garden magic. Those delicate-looking pods hold the key to vibrant blooms that climb your trellis again and again, but timing is everything.
Most gardeners miss the perfect window because they don’t know what to look for. The pods should turn from green to a rich brown and develop a papery texture—this is your cue that the seeds inside are ready.
Skipping this step means lower germination rates or seeds that won’t grow true to type.
In this guide, I’ll walk you through exactly when to harvest for maximum viability, plus the best drying and storage methods to keep those seeds fresh until planting season. Whether you’re a seasoned gardener or just starting, these tips will ensure your sweet peas thrive for years to come.
Ready to turn this year’s blooms into next year’s starters? Let’s get those seeds saved the right way—no guesswork involved.
When to harvest sweet pea seeds for maximum viability and germination
Timing is everything when harvesting sweet pea seeds. The ideal window is late summer to early fall, typically 8-10 weeks after flowering begins. This ensures seeds have fully matured but haven't dried out or been scattered by birds.
In cooler climates (USDA Zones 3-6), aim for late August to September when pods naturally turn brown and crisp.
Watch for visual maturity cues like pods changing from green to dull brown and becoming papery to the touch. If you shake a pod and hear seeds rattling inside, that's your signal. Never harvest when pods are still green or plump—they won't produce viable seeds.
Overripe pods may split open and release seeds prematurely, reducing your yield.
Climate plays a crucial role in harvest timing. In warmer regions (Zones 7-10), pods may mature faster, so start checking in July. Humid conditions can delay drying, while dry, sunny weather speeds up the process. If rain is forecasted, harvest pods early and finish drying indoors to prevent mold.
Pro Tip: Mark your calendar 60-75 days after planting, as most sweet pea varieties take this long to produce mature seed pods. Early blooming varieties may need harvesting as soon as June in southern climates.
| Stage | Pod Color | Texture | Sound Test | Action |
|---|---|---|---|---|
| Early (Not Ready) | Green | Firm, moist | No rattle | Wait 2-3 weeks |
| Ideal (Ready) | Dull brown | Papery, dry | Seeds rattle | Harvest immediately |
| Overripe | Light tan | Brittle, splitting | Seeds scatter | Collect remaining seeds |
Morning is the best time to harvest, as pods are least likely to be damp from overnight dew. Use clean, sharp scissors to snip pods from the vine, leaving a small stem attached to prevent seeds from spilling.
Avoid pulling pods off—this can damage the plant and reduce next year's flower production.
If you miss the perfect window, don't panic. Pods can stay on the vine until they're completely dry and brittle.
Simply collect them when convenient, then finish drying indoors. Store pods in a paper bag in a dry, dark place for a few more days to ensure full dryness before processing.
For hybrid varieties, seed-saving may not yield true-to-type offspring. If you want plants identical to your current blooms, check seed packets for "open-pollinated" labels. These varieties produce seeds that grow into plants with the same characteristics year after year.
Remember, patience pays off with sweet peas. Rushing the harvest can result in seeds that won't germinate, while waiting too long may mean losing your entire crop to birds or weather.
The golden rule is to harvest when pods are dry but still intact—this ensures the highest quality seeds for next season's garden.
Once you've mastered the timing, you'll be able to enjoy self-sown sweet peas popping up in your garden year after year, a beautiful and cost-effective reward for your efforts. 🌸
Step-by-step guide to collecting and drying sweet pea seeds properly
Once you’ve identified your mature sweet pea pods, the next step is careful collection to preserve seed quality. Start by gently twisting pods from the vine—never pull them, as this can damage the delicate stems.
Place them in a paper bag (not plastic) to allow airflow, which prevents mold and speeds up drying.
If pods are still attached but ready for harvest, use clean pruning shears to snip the stems just above a leaf node. Avoid crushing the pods, as this can bruise the seeds inside. Label each bag with the variety name and harvest date to track performance next season.
Now for the critical drying phase: spread the pods in a single layer on a mesh screen or baking sheet in a warm, dry spot. Avoid direct sunlight, which can overheat and damage the seeds.
A cool, dry basement or well-ventilated porch works best, with temperatures between 60-75°F for 2-3 weeks.
🌿
Step-by-Step Seed Collection & Drying Process
- 🔹 Select pods that are fully brown, dry, and brittle.
- 🔹 Twist or snip pods from the vine and place in a paper bag.
- 🔹 Label bags with variety and harvest date.
- 🔹 Spread pods in a single layer on a mesh screen.
- 🔹 Dry for 2-3 weeks in a warm, dry, shady spot.
- 🔹 Test dryness: seeds should rattle loudly when shaken.
- 🔹 Crack open pods and remove seeds with fingers or tweezers.
- 🔹 Store seeds in a cool, dark place in airtight containers.
After drying, gently crack open pods with your fingers or a small pair of tweezers to extract the seeds. Discard any that are shriveled or discolored, as these won’t germinate well.
For extra care, place seeds in a fine mesh bag and give them a final shake to remove any remaining pod debris.
Store your dried seeds in paper envelopes or small glass jars with a silica gel packet to absorb excess moisture. Keep them in a cool, dark pantry where temperatures stay between 40-50°F—this ensures viability for up to 3-5 years.
If you notice any musty smells or mold during drying, immediately move seeds to a drier location and spread them out again. Proper airflow is key to preventing spoilage—don’t rush the process, even if pods look dry on the outside.
✂️