
Pruning
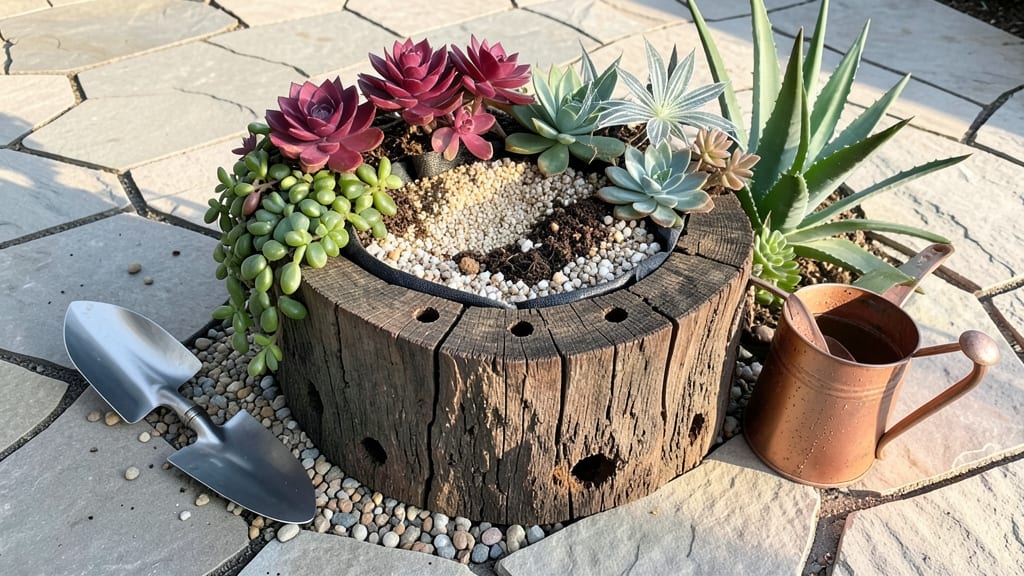
That how to make a tree stump into a planter idea turns dead wood into a thriving garden centerpiece. ✨ I've transformed hollowed-out stumps into rustic, functional planters that add charm and extra growing space—no fancy tools or skills required, just a little creativity and 30 minutes of work.
The secret lies in proper prep: drilling drainage holes, lining the stump to contain soil, and choosing plants that love shallow roots. My first attempt with a painted stump and trailing ivy caught my neighbor's eye instantly—now I get compliments every time I walk by.
By the end of this project, you'll have a self-watering planter that hides its own imperfections while showcasing your garden's personality. The best part? You're giving new life to something most people would toss. Works for any stump size, from tiny tabletop planters to giant patio features.
Let's get that wood working for you again!
📚 In This Guide
- What you need
- Instructions
- Tips and common mistakes
- Wrapping up and next steps
What you need
- ● Tree stump: A freshly cut stump (preferably with a flat top) or one you’ve already removed. Pro tip: If the stump is old, sand or scrape off any moss or decay for a cleaner look!
- ● Waterproof liner: Heavy-duty pond liner (6–12 mil thickness) or a stump planter liner kit (available at garden centers).
- ● Size: Cut to fit the stump’s diameter and depth (add 2–3 inches for overlap).
- ● Drill & bits: A 1/4" or 3/8" drill bit for drainage holes.
- ● Screws or nails: Galvanized or stainless steel (2–4 inches long) to secure the liner.
- ● Potting soil: Well-draining mix (e.g., 60% topsoil, 30% compost, 10% perlite or sand). Quantity: Enough to fill the stump 2/3 full.
- ● Plants: Choose shade-tolerant, moisture-loving plants like ferns, hostas, or impatiens. Size: Small to medium (1–2 gallons).
- ● Stump sealant or paint: For a polished look (choose non-toxic options if planting edibles).
- ● Mulch: Shredded bark or pine straw to retain moisture and suppress weeds.
- ● Decorative stones: Small pebbles or moss for a natural, finished touch.
- ● Watering can or hose: With a gentle spray nozzle for easy watering.
- ● Gloves & safety goggles: Always prioritize safety when drilling or handling tools!
Step-by-Step instructions for transforming a tree stump into a planter
Turn that old stump into a charming, functional planter with just a few simple tools and materials.
🪴 Step 1: Clean and Prepare the Stump
Start by removing any loose bark, debris, or moss from the stump using a wire brush or stiff brush. This ensures a clean surface for your plants and prevents rot. I like to scrub it down with a mix of water and mild soap to kill any lingering pests or fungi. Rinse thoroughly and let it dry completely in the sun—this usually takes a few hours.
If the stump has deep cracks or crevices, use a putty knife to scrape out any remaining debris. This step is crucial because buried debris can trap moisture and encourage mold. Once clean, wipe the stump down with a damp cloth to remove any soap residue. The goal is to create a smooth, stable base for your planter.
💧 Step 2: Drill Drainage Holes and Add a Liner
Using a power drill with a ½-inch bit, drill holes in a grid pattern across the top of the stump. Space them about 3-4 inches apart to allow excess water to escape while keeping the soil in place. This prevents waterlogging, which can drown roots and cause rot. I drill about 10-12 holes for a stump that’s roughly 12 inches in diameter.
Next, cut a heavy-duty plastic liner (like pond liner) to fit snugly inside the stump. The liner should extend 2-3 inches up the sides to contain soil and prevent spillage. Secure it with small nails or staples along the edges, but avoid piercing the liner where drainage holes are located. This ensures your planter stays neat and soil stays put.
☀️ Step 3: Fill with Soil and Plant Your Selections
Fill the liner with a well-draining potting mix, leaving about 1 inch of space at the top for watering. I like to mix in a slow-release fertilizer to give plants a nutrient boost right from the start. Press the soil down gently to remove air pockets, but don’t compact it too tightly—roots need room to grow. For a 12-inch stump, you’ll need about 2-3 gallons of soil to fill it properly.
Choose plants that thrive in shallow root conditions, like succulents, ornamental grasses, or small perennials. Arrange them in the center of the stump, spacing them evenly. Water lightly after planting to help the soil settle around the roots. If you’re using a stump as a multi-plant planter, group plants with similar water needs together to simplify care.
✂️ Step 4: Add Finishing Touches and Maintain
To enhance the rustic charm, paint the stump with non-toxic outdoor paint or stain it for a polished look. Avoid sealing the top if you want to keep it natural—exposed wood adds character. Once planted, place your stump planter in a location with partial shade to full sun, depending on your plants’ needs. Most succulents and grasses prefer at least 4-6 hours of sunlight daily.
Water deeply every 2-3 days during the first few weeks to help roots establish, then adjust based on weather. A mulch ring around the base of the stump helps retain moisture and suppress weeds. Check the soil moisture by sticking your finger 1 inch deep—if it feels dry, it’s time to water. With proper care, your stump planter will last for years and become a standout feature in your garden.
Tips & tricks for perfect tree stump planters
Turning a stump into a planter is easier than you think—here's how to avoid common pitfalls and elevate your garden project.
Cleaning Like a Pro: In Step 1, don't rush the drying time! I learned the hard way that damp stumps can develop mold within days. Place your freshly cleaned stump in direct sunlight for at least 4 hours (or until completely dry to the touch). If you're working in a humid climate, consider using a fan to speed up evaporation. This extra step prevents future rot and keeps your planter looking fresh for years.
Drainage Pattern Strategy: When drilling holes in Step 2, focus on creating a grid that covers 80% of the surface area—not just the edges. For larger stumps (16+ inches), increase to 15-18 holes spaced 3 inches apart. The key is balancing drainage with soil retention. I test my pattern by pouring water—if it drains too fast, reduce hole size to ¼-inch; if it pools, add more holes. This ensures your plants get just the right amount of moisture.
Soil Mix Secret: In Step 3, skip the generic garden soil—it compacts too much and drains poorly. Mix your 2-3 gallons of potting mix with 1 part perlite or coarse sand to improve aeration. For extra nutrients, add ½ cup of compost or worm castings to the bottom layer before adding regular soil. This creates ideal growing conditions right from planting day, especially for shallow-rooted plants like succulents.
Plant Placement Hack: For Step 3's planting arrangement, visualize your stump's final look before digging holes. Place taller plants toward the center and trailing varieties along the edges. I like to sketch a simple diagram first—this prevents overcrowding and makes maintenance easier. Remember, most stump planters can support 3-5 mature plants depending on size, so choose varieties that will complement each other's growth habits.
Pro Tips for Make A Tree Stump Into A Planter
- Turning a stump into a planter is easier than you think—here's how to avoid common pitfalls and elevate your garden p...
- Cleaning Like a Pro: In Step 1, don't rush the drying time! I learned the hard way that damp stumps can develop mold ...
- Drainage Pattern Strategy: When drilling holes in Step 2, focus on creating a grid that covers 80% of the surface are...
Frequently asked questions
Got questions about turning that old tree stump into a stylish planter? You’re not alone! Here are some of the most common queries—and their straightforward answers—to help you get started with confidence.
How long does it take to turn a tree stump into a planter?
With the right tools and a little prep, you can complete this project in 30 to 60 minutes, depending on the stump’s size and condition. Smaller stumps (under 6 inches in diameter) go faster, while larger ones may need extra sanding or sealing time. Pro tip: Work in dry weather to avoid delays from wet wood!
Can I use a fresh stump right after cutting it down?
Not ideal! Fresh stumps are too wet and may rot or mold quickly. Wait 4–6 weeks for the stump to dry out and stabilize. If you’re in a hurry, opt for a pre-seasoned stump (like one from a fallen tree) or speed up drying with a heat gun or fan. Patience pays off—skipping this step can ruin your planter!
What if my stump has deep cracks or holes?
Cracks and holes aren’t dealbreakers! Fill them with wood filler or hydraulic cement for a smooth surface. For larger gaps, use expanding foam or stuff them with mosquito netting before sealing. Sand lightly after repairs to blend the fixes—your planter will look seamless!
Are there alternatives if I don’t want to use a natural stump?
If you prefer a cleaner look, try these stump-free options:
- Concrete planters: Mold stump-shaped forms or use pre-made ones.
- Fiberglass or resin stumps: Lightweight and weatherproof.
- Upcycled wood: Stack and seal logs into a planter “bowl.”
- Metal troughs: Paint them to mimic wood grain.
How do I keep pests (ants, termites, etc.) out of my stump planter?
Pests love damp wood, so prevention is key:
- Apply a waterproof sealant (like polyurethane) to block moisture.
- Drill small holes near the base to improve drainage.
- Avoid overwatering—let soil dry between waterings.
- Add diatomaceous earth or pesticide granules to the soil.
Can I paint or stain my stump planter?
Yes! Staining or painting adds charm and protects the wood. Use outdoor-grade paint or stain (like semi-transparent or solid-color options). For a rustic look, try dark brown or black stains. Tip: Lightly sand the stump first to help the finish adhere better!
Wrapping up and next steps
Transforming a tree stump into a planter is more than just a clever upcycling project—it’s a chance to breathe new life into your garden with minimal effort and maximum charm! 🌱 Whether you’re a seasoned gardener or a DIY beginner, this project proves that creativity and sustainability go hand in hand.
Now that you’ve got the tools, tips, and confidence to tackle it, why not pick up that stump and get planting?
Start small with a single stump, or turn your entire yard into a rustic garden oasis. Next up: Snap a photo of your finished planter and share it with fellow gardeners—inspiration spreads like wildflowers! 🌸